Most people don’t struggle with buying an eSIM. They struggle with the part that happens right after: a QR code, a few confusing toggles, and the classic “Why do I have signal bars but no internet?”
This guide walks you through installation + activation, and also covers the small details that make the difference (like when your plan actually starts and which “roaming” toggle matters).
If you’re using eSIM2get, the flow is simple: the eSIM is delivered immediately after payment, and you follow the install steps for iPhone or Android.
Before you start (2 checks that save real headaches)
1) Make sure your phone supports eSIM
If your phone doesn’t have an “Add eSIM” option in settings, you’ll hit a wall before you even begin. eSIM2get’s quick check is practical:
- iPhone: Settings → Cellular/Mobile Data → look for “Add eSIM”
- Android: Settings → Network & Internet / SIM Manager → look for “Add eSIM” (wording varies by brand)
2) Make sure your phone is carrier‑unlocked
A carrier‑locked phone can block adding a new eSIM profile. On iPhone, Apple’s own check is straightforward: Settings → General → About → Carrier Lock; if it says “No SIM restrictions”, it’s unlocked.
Step 1 — Buy your plan and keep the QR code handy
Once you purchase your plan, you’ll receive a QR code (or activation details). With eSIM2get specifically, the promise is instant eSIM delivery after payment, so you can install right away.
Tip that sounds obvious but matters: open the QR code on a second screen (laptop/tablet) so you can scan it easily.
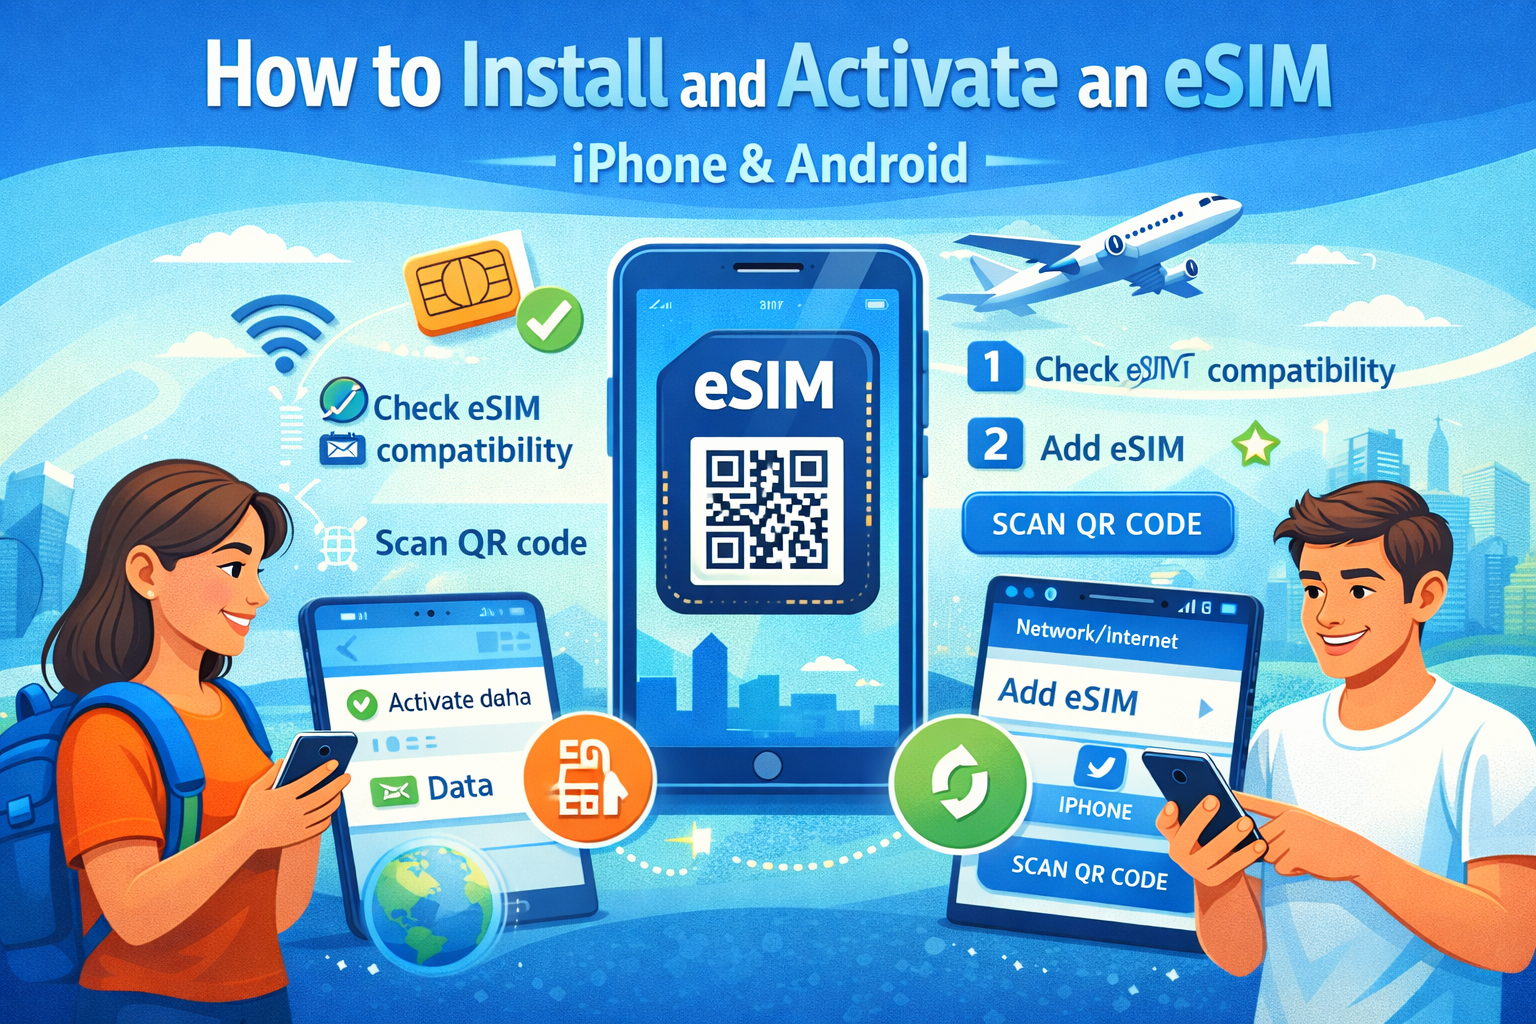
Step 2 — Install on iPhone (QR method)
eSIM2get’s iPhone install path is:
- Open Settings
- Go to Mobile Data (or Cellular)
- Tap Add Plan → Scan QR Code
- Scan the QR code you received after purchase
- Check activation: turn on mobile data and select the eSIM as your primary plan
Apple’s official wording is similar (Settings → Cellular → Add eSIM; QR code is one of the standard setup methods).
Two small iPhone choices that make life easier
- Label the line (e.g., “Travel eSIM”) so you don’t accidentally use it at home.
- If you want to keep your home SIM active for calls/SMS, that’s a normal Dual SIM setup on iPhone.
Step 3 — Install on Android (QR method)
Android screens differ by manufacturer, but eSIM2get’s Android install flow is:
- Settings → Connections or Network & Internet
- SIM Manager / Add eSIM
- Scan QR Code
- Confirm the new eSIM is activated and selected for mobile data
For Pixel phones, Google also confirms you can set up a new eSIM later from Settings if you didn’t do it during onboarding.
Step 4 — Activation: the “roaming” detail that trips people up
Here’s the part most guides bury in a footnote:
On eSIM2get travel data plans, the bundle starts automatically when the eSIM first connects to a supported network with Data Roaming enabled (you can’t schedule a future start time).
What that means in real life
- You can install the eSIM at home (this is actually smart: good Wi‑Fi, no airport stress).
- But don’t make it your active data line until you arrive, unless you’re okay with the plan starting early.
“Data Roaming” — should you turn it on?
For travel eSIMs, yes: eSIM2get explicitly says that on Android after install, you enable Data Roaming for the eSIM when you’re ready to use it abroad.
Step 5 — Pick which SIM is used for data (and avoid accidental roaming fees)
A clean travel setup usually looks like this:
- Home SIM: calls/SMS (keeps your main number reachable)
- Travel eSIM: mobile data
eSIM2get describes this as the typical setup for Dual SIM phones.
Apple also documents Dual SIM travel usage (home line + travel line) and notes that supported models can run Dual SIM with either physical SIM + eSIM, or on newer models, two eSIMs.
Quick “it works” check (do this before you leave the hotel)
Once you land and switch to your travel eSIM for data:
- Turn Airplane Mode ON → OFF (forces a network re‑attach)
- Open a webpage (not just an app—some apps cache content)
- If you have signal but no data:
- confirm Mobile Data is set to the travel eSIM
- confirm Data Roaming is ON for the travel eSIM (common miss)
If you’re still stuck, don’t panic-delete the eSIM. Read the troubleshooting section below first.
Troubleshooting: QR code won’t scan / says “invalid” / nothing works
eSIM2get’s FAQ lists the common fixes:
- make sure the QR image is clear, increase brightness, improve lighting
- confirm the eSIM isn’t already installed (“code no longer valid” can show up if it was previously added)
- ensure stable internet during installation (Wi‑Fi recommended)
- if scanning fails, use manual installation (SM‑DP+ / activation code) if provided
When you run out of data (so you’re not surprised)
eSIM2get is direct about behavior at the end of the bundle:
- fixed-data: once data is consumed, data service stops even if days remain
- some “unlimited” bundles may throttle after a high-speed allowance (depends on the plan)